Plugin Test – RBass vs Maxxbass

After studying various examples of electronic that focuses around bass, I felt that it was important that I become more proficient in the use of two widely used waves plugins – RBass and Maxxbass. The two plugins both use harmonic processing in order to achieve different results. 

First I will look at exactly what the plugins do, and how they do it. 

RBass – After conducting some resarch into the plugin (the Waves website wasn’t much help!), this video seemed to explain the function pretty well

RBass increases perceived bass response by using an algorithm that creates harmonics in order to fill in missing fundamental frequencies further up the frequency spectrum. This allows the bass to be heard better across playback systems with less low end response, and also allows the bass to be heard at lower volumes

Image

Here we have the frequency response of a 60hz sine wave, but with the scale on the analyser pulled down so that we can see the upper tail of the frequency response. 

Image

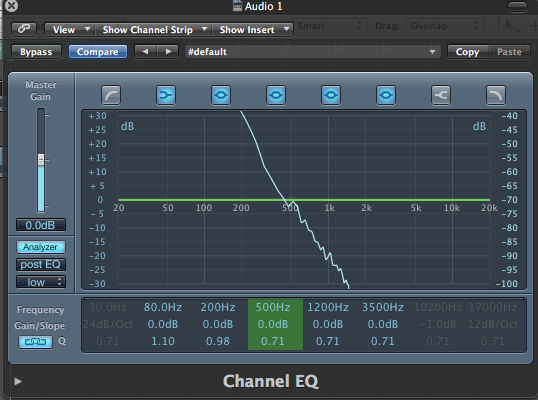
after applying some Rbass, you can see that some new fundamental frequencies are created. Upon listening, I can hear that the bass has a slight “buzz” that gives the bass more presence, especially on smaller speakers. 


Now for MaxxBass

Upon researching into what Maxxbass does, it has become apparent to me that the plugins are in fact very similar. Like RBass, Maxxbass generates harmonics that trick the human ear into hearing the fundamental, even if the playback system can not generate the fundamental frequency. 

While their function is very similar, maxxbass gives you far greater control over this tool, by giving you control over inout signal, original bass, and maxxbass. There are also tools for crossover, different presets, and control on dynamics. This makes the maxxbass (in theory) superior to the RBass. 

Image

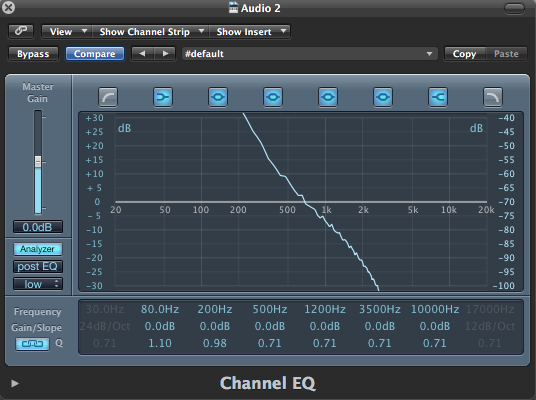
As you can see above, Maxxbass (with the same output db as the RBass example) creates more frequencies, and extends further up the frequency spectrum. This allows for greater audibility on smaller speakers. 
Howvever upon A/B’ing the two examples, I found that while Maxxbass gave greater high end extension and transferability, RBass added a weight to the low end which was very appealing to listen to. 

This different is subjective from my listening, but the conclusion I can draw from this comparison is that Maxxbass is good for making bass transferable across small speaker systems, whereas Rbass is good at adding weight to low end instruments.

Both are good alternatives to EQ’ing the bass, which can often result in bass eating up too much headroom in the mix. 

I plan to use the two plugins where appropriate in my own work, relevant to my findings. 

Bondax Gold (Snakehips Remix) – Bass Management

Upon critically analysing previous pieces of work I had done, it has become apparent to me that there are some issues regarding the mixing of my bass synth and sub bass.

Here is a previous piece of work of mine:

There is unwanted digital distortion on the bass from using too much Maxbass (waves). This was due to an attempt to get the bass to transfer onto smaller speakers easier.

Here is an example of that task being accomplished much more effectively –

The bass appears to have a slight crunch in it, without any distortion, which gives it presence across different speaker sizes. After researching into the topic of sub bass management, and speaking to Mark Atherton, one theory for what they have done here is that they have used a low-passed square wave. The added harmonics of a square wave help to give the bass more presence in the mix compared to a straight sin wave, and a result requires less distortion in order to be heard.

In the future, I will try this technique to see if I have success with it.


Sub Bass control and Management – SBTRKT – Living Like I Do

Above is a track from a producer I highly admire, and is a mix that I enjoy greatly. When listening on laptop speakers, the sub bass line is inaudible, and so the intro sounds like complete silence to a listener in this form. However, when listening on a playback system with a good low end response, it is apparent that the bassline is a key element of the song, and is executed very cleanly I feel.

This is a good example of a well controlled, modulated reese bass. The movement of the LFO’s modulating the bass gives the bassline interest and groove. I will have to study further into reese basses in order to try this out for myself.

However, as I highlighted before, the bass does not transfer well across systems without good low end response. One could argue whether or not engineers should take into consideration the “casual” listeners that will listen on laptop speakers, especially in a genre that is not necessarily radio focused, and is more at home in a club.

Screen Shot 2014-04-24 at 12.08.18


Above is a screenshot of the full track response in the first 6 seconds of the track, no filters applied. You can seee that there is a large amount of sub frequency content, and does not appear to be distorted in order to create harmonics higher up the frequency range.

After studying this piece of music, I aim to try using less processing to distort the bass frequencies on tracks that are intended for club use. It is important to regard the environment in which the end product will be played most.

Vocal Arrangement and pitching – James Blake – I never Learnt to Share

Continuing on my research into creating interesting vocals, I have been listening to this song.

In my AST feedback, one of the comments was that the vocals lacked interest. The above song is a great example of vocals being interesting, both as a result of arrangement and pitching effects. The backing vocals are either a result of pitching software, or being played through a vocoder – I’m not quite sure which. The result is an electronic feeling vocal, which is highly appropriate to the synth driven music style.

The vocal is also arranged in a highly interesting fashion musically, something that is not technically relevant, but possibly much more important to the overall feel of the track

I will aim to use pitching software in order to create interesting backing vocal arrangements, and add electronic feeling to them

Effects: Delay – Calvin Harris – You Used to Hold Me

In response to the feedback from my AST recordings, I have been listening to how different effects are used in order to create interest for the listener, and take a mix beyond that basic foundation level.

Here is a track from globe trotting DJ Calvin Harris. This song is from earlier on in his career, but is a great example of vocal processing taking the track beyond the foundation level, and creating an interesting and immersive experience for the listener. For the sake of my study, an acapella would be really helpful to listen to….

Ah, how convenient:

This is very interesting to listen to. You can clearly hear the vocal layering and effects he uses on the vocal. For the sake of this post, we will focus on the delay.

There is a heavy amount of delay, which is applied in a rhythmic fashion, and is in time with the beat. There is also variation between the left and right delay timings, with the two changing between crotchet, semi crotchet and minim delays.

The interesting part is how he applies the delays. The delays are not always applied to the whole phrase, but are in fact applied to single words or phrases that he wants to emphasise. This has a greater impact effect on the listener, and means that the voice becomes a huge arrangement.

He combines this with some reverb to create a massive, anthemic vocal sound. There is also great layering and lots of compression, but overall it makes the vocal stand out amongst an already hectic mix.

I aim to try these delay tricks myself, using the soundtoys echoboy plugin – a very versatile and powerful creative delay plug in.

Listening games – Quiztones

On the recommendation of my friend Ben Chick, I have downloaded an app called quiztones. This app is essentially a game for guessing the frequency of different sine tones.
Playing the game in expert mode, you are given 10 different sine tones, and you are asked to pick an answer from the four available. The point system works as follows: you receive 100 points for getting it right first time, 50 for second time, 25 for third. etc.

I have been playing this game for the past two weeks now, and have recorded some scores as follows.


1st game – 550

2nd game – 500

3rd game – 600

4th game – 675

5th game – 650

6th game – 725

7th game – 725

8th game – 850

9th game – 750

10th game – 800


The results show an overall vast improvement in my ability to recognise frequencies so far. I will continue to play this game to further tune my ear.

EQ – Approaches to tackling EQ

After analysing the feedback I received for my AST recordings, one of the core areas I have decided to focus on is EQ’ing.

I have been reading Paul Stavrou’s mixing with your mind, and as a result have acquired some useful theoretical knowledge regarding my approach to using EQ.

Stavrou emphasises that when finding the frequency you want to EQ, you should never sweep around the frequency spectrum in order to find the frequency you are after. Instead he suggests the process of “guess > listen > compare”. This trains your ear to know what the frequencies across the spectrum sound like. Sweeping for the right frequency is “like a piano player strolling up and down the keyboard looking for the next note”.

He also details his method for “EQ’ing with hindsight”. By this, he explains why you shouldn’t EQ everything while solo’d – instead, EQ (for instance) the piano and the lead vocal together – The way you EQ the piano will have a large tonal effect on the lead vocal. By EQ’ing in this context, you EQ in comparison to the sounds in the mix, and end up with an overall more balanced mix.

These approaches makes sense to me, and I will aim to use them next time I am in the studio.