There are lots of different types of delays, and the different terms used to describe some of them can become baffling at times. This article from Sound on Sound really helped me define the different types, and to get more familiar with terminology
By becoming familiar with the different types of delay, it will help me when designing one to use in a mix, and how to select the one appropriate to the application.
This is a subtle and effective use of an effect in order to create interest in an arrangement that could otherwise suffer from being uninteresting and stale. The electric piano has chorus applied to it (subtly), which gives the piano movement and a sense of width, making the sound ‘bigger’. The nature of the arrangement mean that without this movement, the chords could sound very dull and repetitive.
I aim to work in this genre of music a lot, so subtle effects in a mix can make a huge difference overall. I will try using chorus on elements that are repetitive and uninteresting in nature in order to add interest and movement.
It’s finally happened. I’ve found a record I will never be able to enjoy completely as a listener again.
Here is ‘Red Hot Chilli Peppers – Californication’. having listened to this growing up, and having enjoyed it thoroughly without hindrance previously, it’s a great shame to now be able to distinguish the problems with the master.
The track suffers from serious over compression and over limiting. Listening to it with trained ears now, it’s clear to hear how the compressor squashes the attack transients of nearly all the elements in the mix. The guitars and vocals suffer greatly, and in the chorus have a serious ‘pumping’ effect on them as a result of the over compression. You can also hear hints of digital distortion creeping into the mix as a result of over limiting.
This is a great shame, as it is a great record. One could argue that the record enjoyed immense success, despite it’s problems. So maybe it’s just engineers who care… anywho, It would be interesting to hear a remastered version, if such a version does exist.
As someone who takes great interest in ambient electronic music, I was most intrigued to discover that Coldplay had taken a new direction into this area with their new video appearing online, “Midnight”. The track sees the band employing the help of Jon Hopkins to produce the track, a collaboration I certainly approve of.
In this post, I wish to study the Vocal processing they have used on Chris Martin’s vocal. There are several choices made by the producer and/or engineer in order to characterise the track to the genre.
Upon listening, it is immediately noticeable to me that the vocal has a lot of reverb present. The Reverb has a long decay time, and a very short pre delay (if any at all). The use of a long reverb like this helps create an atmospheric ambience to the track, and is used as a creative tool rather than just a tool to make the vocal sit in the mix. The reverb appears to change decay time in appropriate places in the track, such as in the instrumental breakdowns.
The vocal is heavily multi-tracked, and is layered multiple times with harmonies. Some of these harmonies are created with what appears to sound like a vocoder, creating a very electronic sound to the vocal arrangement. The main vocal line appears to be heavily tuned, using melodyne for instance. This, again, gives an electronic feel to the vocal, and makes the track more abstract.
1)Taking from this study, I have processed a vocal in a similar way on one of my own recordings, by replicating the heavy use of tuning software on the BV’s in order to create a robotic feel.
2) I have also tried using a very long reverb on a vocal as an ambient effect, and using a second reverb to place the vocal in the mix. This has proved successful for me upon trying this out, and is an effect I have enjoyed using on ambient music of my own.
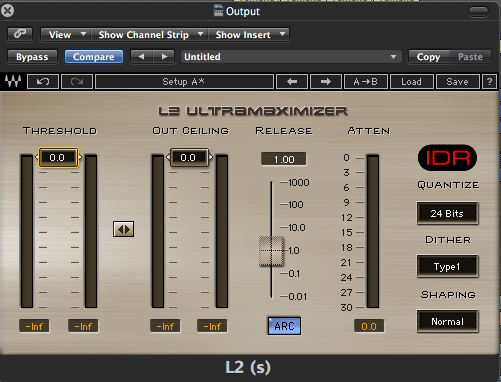
One of the areas that was highlighted heavily in my AST feedback was that I had been “heavy handed” with the L2, and as a result had added distortion to the tracks. Following this feedback, I feel it is important that I address this issue by learning to hear what distortion from limiting sounds like.
Above is a little picture of the beloved waves L2 – an exceptionally powerful mastering plug in used widely in mastering processes across the world.
I am using this limiter for my listening, as it is the limiter I use the most in the mixing and mastering of my tracks.
Using the dual fader control function, I listened to the effect that the limiter had on a stereo track while keeping the output level constant. This allowed me to hear exactly when the L2 was degrading the sound quality and causing digital distortion.
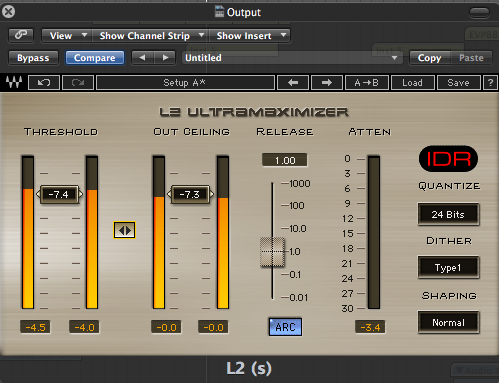
Although the screen shot did not capture it, at this point the L2 started to attenuate the track ever so slightly (between 1-2 dB when the kick or snare hit). However, this did not add any audible distortion to the track, so I continued to pull down the threshold.
As the limiter reached between 3-6dB attenuation, the kick and snare started to suffer, and suffered from a effect that sounded similar to transient smearing. There were slight hints of distortion when the kick hit.
Going beyond this, the track started to suffer from pumping, as the track was being attenuated so much when L2 was reacting to the loud kick drum. At this point, distortion is fairly apparent, in the form of a nasty digital fuzz present particularly on transient hits.
Going from this listening test, I feel that when using the L2 on a master channel, anything more than 3dB attentuation and you are in danger of adding unwanted distortion to tracks. The genre of music dictates how much you can get away with really – an acoustic track would sound awful with even slight distortion, whereas a synth driven pop song may mask the distortion a little, so can get away with higher levels of attenuation.
In order to study drum replacement, I am taking a little detour into the world of pop-punk
This track is a fairly obvious example of drum replacement I feel – If you listen to the snares in the intro, they are all very consistent and similar, giving the drum and an almost unnatural feel. However, I feel that the sound is appropriate to the genre.
So drum replacement – should we all be recording our kits with 58’s on every element, then fully replacing them all? I went into the studio with my dear friend Ben as my drummer, and tried a little experimentation with the software Trigger.
Upon using the software, I discovered a few things.
– It’s not as simple as it first sounds
– Yes you do still have to mix the drums
– Some of the samples actually kinda suck
My first tactic was to fully replace the drums with spanking fresh samples from the trigger library. This didn’t exactly do what I intended, and I found that this gave an extreme version of the example I spoke of above, where the playing sounds unnaturally consistent, and very false.
I found that the best result was by first achieving a good capture sound, and then using sample replacement to fill in the ‘gaps’. I think that genre’s like Pop punk have suffered as a result of over using software like trigger.
What can I take from this? The snare on my AST recording of ‘Paige D – Carry on’ desperately could have benefited from some sample replacement on the snare – the capture was poor, and so was the mix, so the overall sound had a serious lack of depth. Note to self – don’t over use this software though.
Hear me out here. Now, you may question my decision to study the work of ex-busted member Charlie Simpson. However, upon hearing this track for the first time, the drum sound immediately caught my attention as a well recorded, fairly traditional drum sound. As “plain” as it may be, i think it’s important to be able to achieve the basic drum sound you would typically hear before delving into more interesting drum sounds (see the 1975 post).
Upon listening to the intro drum pattern on loop, there are a few things I have noted.
– The feel of the drums have been left fairly loose, and appear to be fairly untouched by time adjustment software.
– The compression on the snare is very heavy – almost too heavy? However it sounds fairly fat, and they were after that sound…
– From what I can hear, all elements of the drum kit appear to be have been sent to a reverb bus, giving the kit an overall sense of space, and makes the listener feel like they are listening to a live drum performance on a stage.
Taking from this, I would like to try different drum reverbs on the overall kit of some of my recordings and compare the differences.
I believe it is also a lesson on capturing a performance – if you have to edit the hell out of a drum take to get it in time, then maybe it’s not the right performance.
Above is a track, proudly produced and engineered by two LIPA graduates. Hoorah!
Following my AST hand in, I feel that this is a good example of a “big” drum sound, in the context of a band. It has a slightly unusual sound to it, and is processed in an interesting fashion. One of the most striking things about the drum sound is the reverb. Upon first listening, the drums have the illusion of being recorded in a large hall, or having a large reverb applied to the whole kit. However upon listening to the overall elements, I’m not sure this is true.
The Kick and snare both appear to have a similar reverb on them – a fairly large hall reverb with a hefty amount of wet signal. The result is big booming drums that immediately impact upon the listener. However, if you listen to the hi-hats and cymbals, they sound almost completely dry in comparison. This contrast gives the kit a dynamic, interesting sound, and grabs the listeners attention.
The abstract sound of the snare makes me question whether it has been sample replaced or not, as it almost doesn’t sound like a snare drum. I also wonder whether they have pitched it down or not?…
The main thing I can take away from this recording is the contrast in the drums. I will try this variation in reverb times on a future drum sound, rather than washing the whole kit in the same reverb bus and killing it’s impact.
Following the feedback from my AST recordings, It has become evident to me that as well as individual flaws in the drum sound, there is a distinct lack of presence in the overall sound of the drums. After discussing the topic with my classmates, it was suggested that parallel compression was definitely worth a try.
I headed into the studio armed with the stems from the drum recording Kieran and I did for the Paige D track for AST. I decided to use the drawmer 1968, with a very low threshold, in order to squash the sound. I sent the drums out as a single bus, and compressed them, then added them to the original signal.
The result was pleasantly surprising. The parallel compression added a perceived thickening in the overall sound of the drums, without killing the transient of the kick and snare.
Following trying this out, I feel that our mix hand in could have benefited from using this technique before.
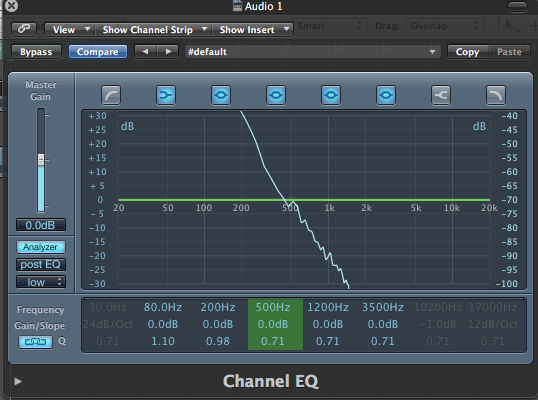
After studying various examples of electronic that focuses around bass, I felt that it was important that I become more proficient in the use of two widely used waves plugins – RBass and Maxxbass. The two plugins both use harmonic processing in order to achieve different results.
First I will look at exactly what the plugins do, and how they do it.
RBass – After conducting some resarch into the plugin (the Waves website wasn’t much help!), this video seemed to explain the function pretty well
RBass increases perceived bass response by using an algorithm that creates harmonics in order to fill in missing fundamental frequencies further up the frequency spectrum. This allows the bass to be heard better across playback systems with less low end response, and also allows the bass to be heard at lower volumes
Here we have the frequency response of a 60hz sine wave, but with the scale on the analyser pulled down so that we can see the upper tail of the frequency response.
after applying some Rbass, you can see that some new fundamental frequencies are created. Upon listening, I can hear that the bass has a slight “buzz” that gives the bass more presence, especially on smaller speakers.
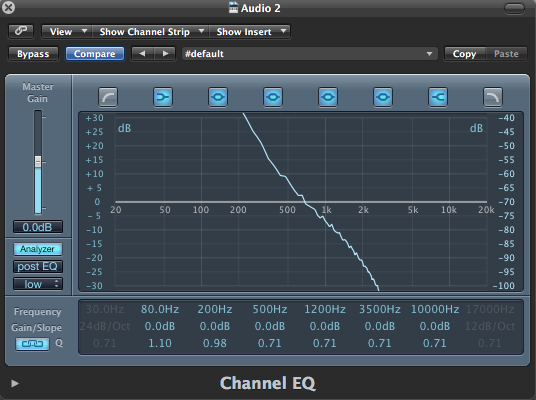
Now for MaxxBass
Upon researching into what Maxxbass does, it has become apparent to me that the plugins are in fact very similar. Like RBass, Maxxbass generates harmonics that trick the human ear into hearing the fundamental, even if the playback system can not generate the fundamental frequency.
While their function is very similar, maxxbass gives you far greater control over this tool, by giving you control over inout signal, original bass, and maxxbass. There are also tools for crossover, different presets, and control on dynamics. This makes the maxxbass (in theory) superior to the RBass.
As you can see above, Maxxbass (with the same output db as the RBass example) creates more frequencies, and extends further up the frequency spectrum. This allows for greater audibility on smaller speakers. Howvever upon A/B’ing the two examples, I found that while Maxxbass gave greater high end extension and transferability, RBass added a weight to the low end which was very appealing to listen to.
This different is subjective from my listening, but the conclusion I can draw from this comparison is that Maxxbass is good for making bass transferable across small speaker systems, whereas Rbass is good at adding weight to low end instruments.
Both are good alternatives to EQ’ing the bass, which can often result in bass eating up too much headroom in the mix.
I plan to use the two plugins where appropriate in my own work, relevant to my findings.